Photorefraction
Ai-Hou Wang, M.D., Ph.D.
攝影驗光法是用相片記錄瞳孔反光,由相片上紅眼反光的大小去分析、判讀受測者的屈光值。目前有許多設計,使用同樣的光學原理,不用相片而是用錄影、用電腦,因此統譯為「攝影驗光法」。目前市售的攝影驗光儀(photorefractor)都採用離軸攝影驗光的光學原理。
Photorefractory
optics uses photographs to record pupil reflections and analyzes the magnitude
of the red-eye reflection in the photograph to determine the subject's
refractive value. Currently, many designs use the same optical principle but
instead of photographs, they use video recordings and computers; hence, they
are collectively translated as "photorefractory optics." Most
commercially available photorefractors currently
employ the optical principle of off-axis photorefractory optics.
攝影驗光法的英文是photorefraction。photo指的是相片,原意是用相片記錄瞳孔反光,由瞳孔的反光讀出眼球的屈光值,由英文直譯是「相片驗光法」。目前有許多使用同樣光學原理的設計,但是不用相片,而是用錄影,用電腦,因此統譯為「攝影驗光法」頗為適當。
The
English term for photographic refraction is "photorefraction."
"Photo" refers to a photograph, and the original meaning was to
record the reflection of light from the pupil using a photograph,
and then read the refractive value of the eye from the reflection. A
direct translation from English would be "photographic refraction."
Currently, many designs use the same optical principles, but instead of
photographs, they use video recordings and computers; therefore, the general
translation "photographic refraction" is quite appropriate.
攝影驗光法是在一段距離
(50~100+cm)之外驗光, 尤其適合嬰幼兒的驗光。在一段距離之外驗光一直是小兒眼科醫師的夢想。一般的驗光機或手持式驗光機
(例如Nikon Retinomax)、即便是網膜鏡檢影法也得使用中和鏡片,都要非常的靠近受測試者。太近的測試距離嬰幼兒通常會害怕會哭,同時也無法注視驗光機洞裡的視標。
Photorefractive
refraction is performed at a distance (50-100+ cm), making it particularly
suitable for infants and young children. Performing refraction at a distance
has always been a dream for pediatric ophthalmologists. Regular or handheld
refractometers (such as the Nikon Retinomax), and
even retinoscopy, require the use of neutralizing lenses and must be very close
to the subject. Testing at such close distances usually frightens infants and
young children, causing them to cry, and they also cannot focus on the target
inside the refractometer's aperture.
第1
節
攝影驗光法的發展
1.1 攝影驗光儀的發展史
1970年代起,Howland和Kaakinen先後發展了同軸 (coaxial) 和離軸 (off-axis)的攝影驗光法。光源和鏡頭同軸的兩種方式是(1)正交攝影驗光 (Orthogonal
photorefraction, 1974) 和(2)各向同性攝影驗光 (Isotropic
photorefraction, 1979)。Kaakinen
1979發展出離軸攝影驗光 (Eccentric photorefraction or
Knife edge photorefraction) (圖4-1),將相機的閃光燈移到接近鏡頭中央,從相片上紅眼反光的大小去分析、判讀受測者的屈光值。目前市售的攝影驗光儀 (photorefractor)都採用離軸攝影驗光的光學原理。
Section
1 Development of Photorefractory Methods
1.1
History of Photorefractor Development
Starting
in the 1970s, Howland and Kaakinen successively developed coaxial and off-axis
photorefractory methods. The two methods of coaxial light source and lens are
(1) orthogonal photorefractory (1974) and (2) isotropic photorefractory (1979).
Kaakinen developed off-axis photorefractory (Eccentric photorefractory or Knife
edge photorefractory) in 1979 (Figure 1), which involves moving the camera
flash closer to the center of the lens and analyzing and interpreting the
refractive value of the subject based on the magnitude of red-eye reflection in
the photograph. Currently, commercially available photorefractors
all use the optical principle of off-axis photorefractory.
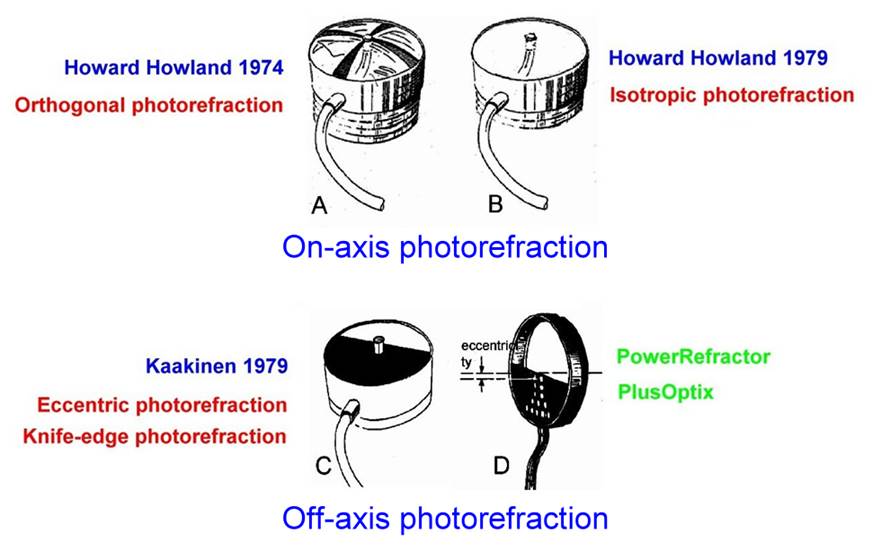
Figure 1 Orthogonal photorefraction,
Isotropic photorefraction,
and Eccentric photorefraction
1.2 攝影驗光儀市況
市售攝影驗光儀有Plusoptix S12 (前身為PowerRefractor),Welch Allyn公司的SPOT (前身為Suresight),2Win,iSreen。Gobiquity GoCheckKids則試圖使用iPhone來作攝影驗光法。早期的攝影驗光儀則有MTI,ViVA,Topcon公司的PR-1000,PR-2000等等。這些儀器大都朝向驗光機的方向設計,但是測量的準確度比傳統的驗光機差很多,不適合作精確的驗光配鏡,而是用於眼科或小兒科門診的初篩或者幼兒園、托兒所的視力篩檢。也有人提議在人潮熱區設置攝影驗光亭 (booth),好像快拍相片亭一樣,電腦自動判讀,拓廣視力篩檢的範圍與層面。
1.2 Market Status
of Photorefractive Optometrists
Commercially available photorefractive optometrists include Plusoptix S12 (formerly PowerRefractor), Welch Allyn's SPOT (formerly Suresight), 2Win, and iSreen. Gobiquity GoCheckKids attempts to use an iPhone for photorefractive
optometry. Early photorefractive optometrists included MTI, ViVA, and Topcon's PR-1000 and PR-2000. These
instruments are mostly designed
to resemble traditional refractometers, but their measurement accuracy is much lower,
making them unsuitable for precise refraction and prescription glasses. They
are better suited for
initial screening in ophthalmology or pediatric clinics, or vision
screening in kindergartens and daycare
centers. Some have proposed
setting up photorefractive optometry
booths in high-traffic
areas, similar to quick photo booths,
with automatic computer interpretation to broaden the
scope and level of vision screening.
在網路上,攝影驗光法資料比較詳細的網址是ABCD
(Alaske Blind Children
Discovery http://abcd-vision.org/ 之下的Vision
Sceening,再之下的Photoscreening http://abcd-vision.org/vision-screening/photoscreening.html。
On the internet, the most detailed information on photorefraction
is available at ABCD (Alaske Blind Children Discovery
http://abcd-vision.org/, under Vision Sceening, and then Photoscreening
http://abcd-vision.org/vision-screening/photoscreening.html).
第2節 攝影驗光法的光學
攝影驗光儀的雛形是將拍立得相機的閃光燈拆下,移置到非常靠近鏡頭中央的位置 (圖4-2),由瞳孔反光(Crescent)的大小來判讀度數。
Section
2 Optics of Photographic Optometry The prototype of the photographic optometry
instrument was to remove the flash of an instant camera and move it to a
position very close to the center of the lens (Figure 4-2), and to determine
the diopter by the size of the pupil reflection (Crescent).
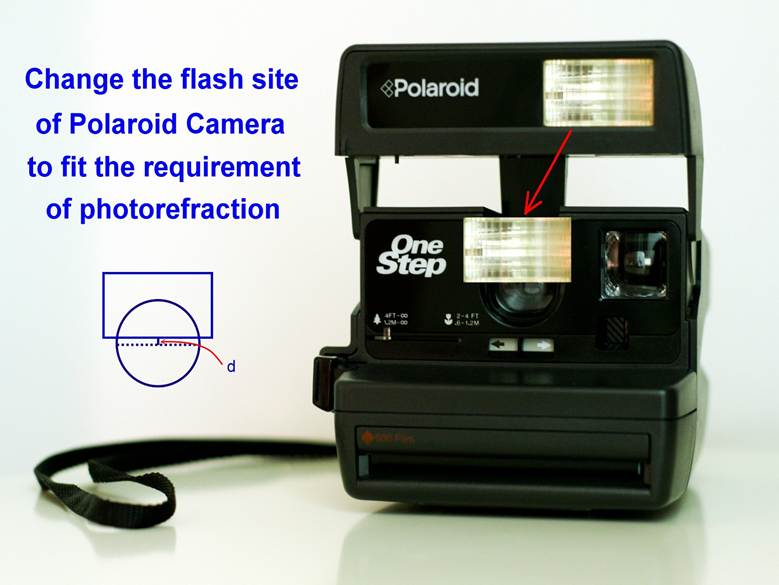
圖4-2
拍立得相機改裝閃光燈而成的攝影驗光儀的雛形
Figure
2 A prototype of a photographic optometry device made by modifying a Polaroid
camera into a flash unit.
低度數屈光不正沒有瞳孔反光,高度近視的瞳孔反光在閃光燈的同側,而高度遠視的瞳孔反光在閃光燈的另側
(圖4-3)。在低度數屈光不正,例如遠視+2D和+3D,反光的大小差異很大,對屈光的鑑別度佳;而在高度數屈光不正,例如遠視+7D和+8D,反光大小的差異就很有限,屈光的鑑別度就不好了。
Low-degree
refractive errors show no pupillary reflection. In high myopia, the pupillary
reflection is on the same side as the flash, while in high hyperopia, it is on
the opposite side (Figure 4-3). In low-degree refractive errors, such as
hyperopia +2D and +3D, the difference in reflection size is significant,
resulting in good refractive discrimination. However, in high-degree refractive
errors, such as hyperopia +7D and +8D, the difference in reflection size is
very limited, leading to poor refractive discrimination.
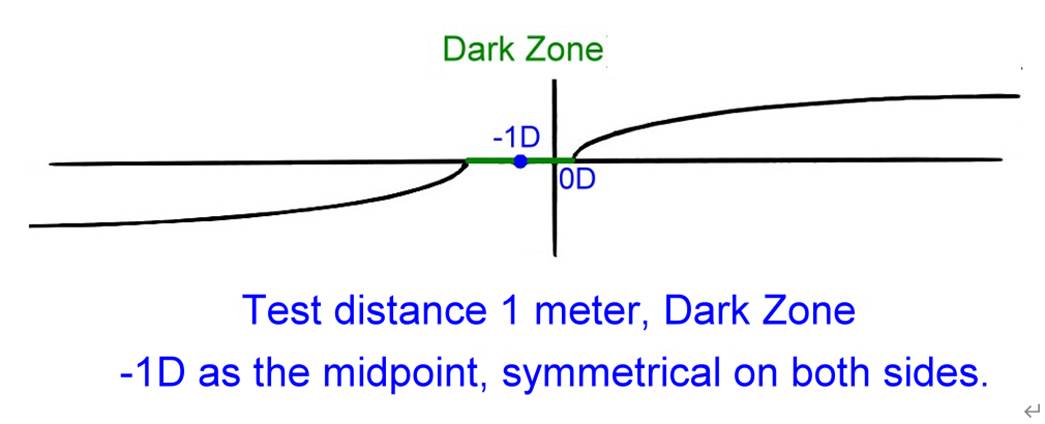
圖4-3橫軸為屈光值,縱軸為反光大小。近視、遠視的瞳孔反光在相反側。
圖形的對稱中點是測試距離的焦度(vergence)。
Figure
3 shows the refractive index on the horizontal axis and the reflectance on the
vertical axis. The pupillary reflectance is on opposite sides for myopia and
hyperopia.
The
midpoint of the graph represents the vergence at the test distance.
2.1 攝影驗光法的光學公式
攝影驗光法的光學公式是康乃爾大學Howard
C. Howland (圖4-4)首先提出,1999年我在不知情的情況下也自行導出同樣的公式。
2.1
Optical Formula of Photorefraction The optical formula of photorefraction was
first proposed by Howard C. Howland of Cornell University (Figure 4-4). In
1999, I also derived the same formula on my own without knowing the facts.
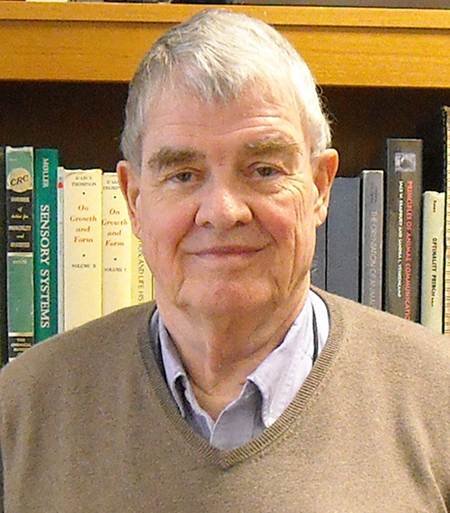
Figure 4 Dr. Howard
C. Howland
基本的光學公式是 d = DF x Pu x L x RR
* d:視線、光線的距離(或者是閃光燈邊緣和鏡頭中心的距離)
* DF
(Dark Fraction):暗區比例
(=1–Crescent) (1-亮區比例)
(圖4-5),
在這個例子裡,暗區=3/4,亮區=1/4)
* Pu:瞳孔直徑
* L:測試距離
* RR (Relative refraction):相對屈光。例如在1公尺距離作測試,則以 -1D為基準點。- 4D的RR是 -3D、正視眼的RR是 +1D、+3D的RR是 + 4 D等等。
The basic optical formula is d
= DF x Pu x L x RR
* d: Line of sight, distance of
light (or the distance between the edge of the flash and the center of the
lens)
* DF (Dark Fraction): Dark area
ratio (=1 – Crescent) (1 – Bright area ratio) (Figure 4-5). In this example,
dark area = 3/4, bright area = 1/4.
* Pu: Pupil diameter
* L: Test distance
* RR (Relative refraction):
Relative refraction. For example, when testing at a distance
of 1 meter, -1D is used as the reference point. -4D RR is -3D, RR for
emmetropia is +1D, RR for +3D is +4D, and so on.
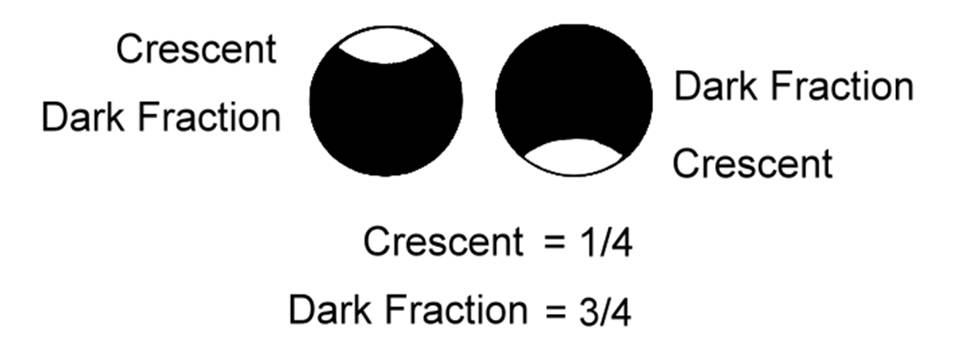
圖4-5
暗區、亮區與瞳孔的比例。本例圖示亮區/瞳孔=1/4,暗區/瞳孔=3/4。
Figure
5 shows the ratio of dark area, bright area, and pupil. In this example, the
ratio of bright area to pupil is 1/4, and the ratio of dark area to pupil is
3/4.
斜向散光的瞳孔反光
(Crescent)也是傾斜的 (圖4-6)。試圖直接從斜向反光的形狀、角度去計算屈光的公式請參考Wesemann
W, Norcia AM, Allen D. Theory of eccentric photorefraction (photoretinoscopy):
astigmatic eyes. J Opt Soc Am A. Dec;8(12):2038-47,
1991.
The
pupillary reflection (Crescent) in oblique astigmatism is also oblique (Figure
4-6). For formulas that attempt to calculate refractive error directly from the
shape and angle of the oblique reflection, please refer to Wesemann W, Norcia
AM, Allen D. Theory of eccentric photorefraction (photoretinoscopy):
astigmatic eyes. J Opt Soc Am A. Dec;8(12):2038-47,
1991.

圖4-6
斜向散光的瞳孔反光也是傾斜的
Figure
4-6 shows that the pupillary reflection in oblique astigmatism is also oblique.
2.2 PowerRefractor
PowerRefractor由三個方向的光源,讀取三個方向的數據去作攝影驗光法
(圖4-7)。這三個方向之中至少有兩個方向的瞳孔反光是傾斜的反光,也必定是利用該篇論文的計算方式去求取屈光值。一般的屈光值包含有球鏡度數、柱鏡度數和柱鏡角度三個變數,PowerRefractor測量三個方向的數值去轉換為屈光值的三個變數,也算是滿合理的。
2.2 PowerRefractor The PowerRefractor uses light from three directions to read
data from each direction for photorefraction (Figure 4-7). At least two of
these directions show oblique pupillary reflections, and the refractive value
is calculated using the method described in this paper. A typical refractive
value includes three variables: spherical power, cylindrical power, and
cylindrical angle. It is reasonable for the PowerRefractor
to measure values from three directions and convert them into these three
variables for the refractive value.
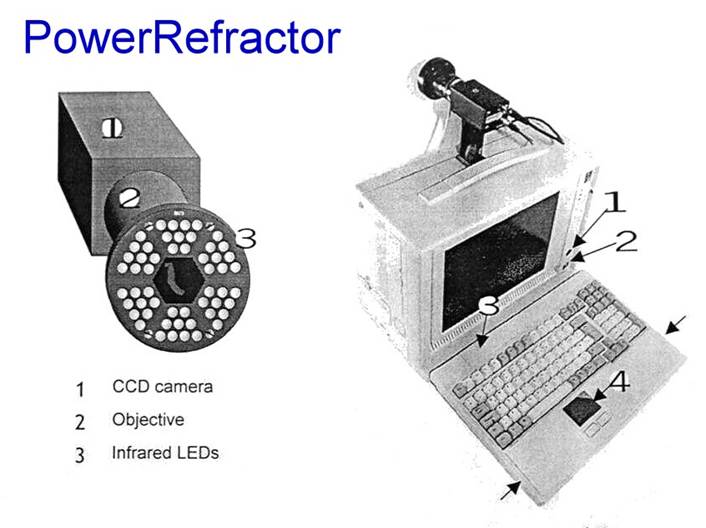
圖4-7 PowerRefractor測量三個方向的數據去計算眼球屈光值的三變數:
(1)球鏡度數、(2)柱鏡度數、(3)柱鏡角度。
Figure
4-7 PowerRefractor measures data in three directions
to calculate the three variables of the eye's refractive value: (1) spherical
power, (2) cylindrical power, and (3) cylindrical angle.
2.3 直接眼底鏡的光學結構
直接眼底鏡的光學結構完全符合攝影驗光法的光學原理,為了能夠經由極小的瞳孔去檢查眼底,它的光源和視線設計成非常的靠近
(圖4-8),幾乎是同軸的。
2.3
Optical Structure of Direct Fundus Camera The optical structure of the direct
fundus camera fully conforms to the optical principles of photorefraction. In order to examine the fundus through the extremely small
pupil, its light source and line of sight are designed to be very close (Figure
4-8), almost coaxial.
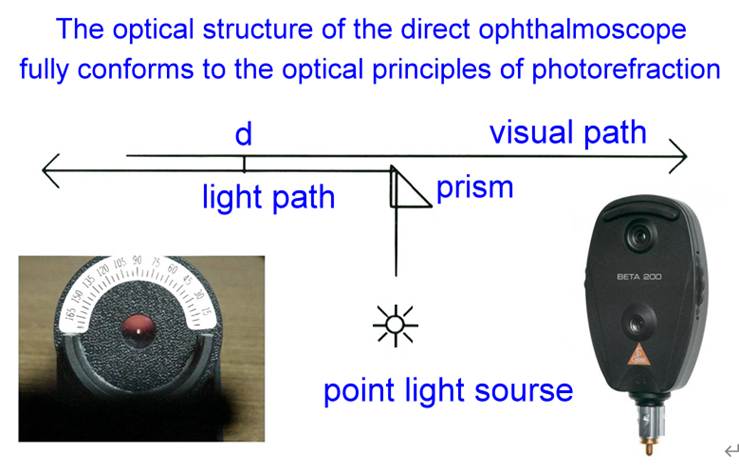
圖4-8
直接眼底鏡的光學結構完全符合攝影驗光法的光學原理
Figure
4-8 shows that the optical structure of the direct fundus microscope fully
conforms to the optical principles of photorefraction.
從50~
From a
distance of 50-100 meters, observe the patient's pupillary red reflex
through the viewing port of a direct ophthalmoscope (similar
to the Hirschberg test for strabismus). Low-degree refractive errors
fall within the non-reflective zone of photorefraction, resulting in no
pupillary reflex and a dark pupil. If a reflex (crescent) is seen above the
pupil, it indicates high hyperopia; if a reflex is seen below the pupil, it
indicates high myopia (Figure 4-9). This is very useful in pediatric
ophthalmology examinations, allowing for a preliminary assessment of the
approximate refractive state without the need for a neutralizing lens.
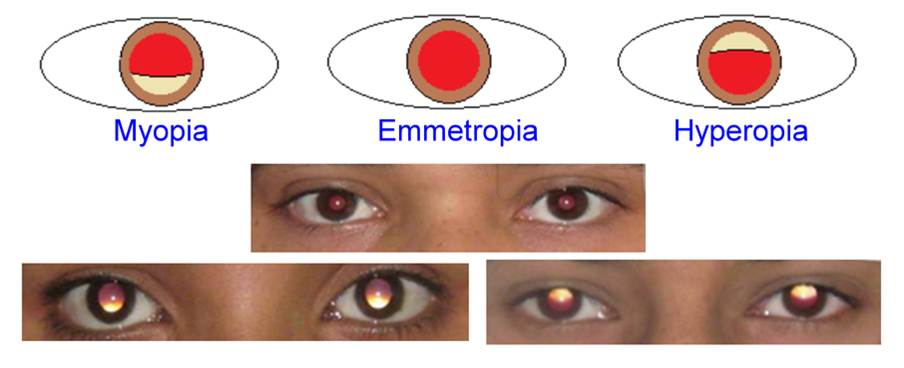
圖 4-9 由直接眼底鏡的視孔看瞳孔反光,瞳孔下方有反光 可判知是高度
近視眼,瞳孔上方有反光是高度遠視眼。
Figure 4-9 shows the pupil reflection as seen through the viewing aperture of a
direct ophthalmoscope. A reflection below the pupil indicates high myopia,
while a reflection above the pupil indicates high hyperopia.
2.4 Brückner反光檢查
瞳孔的Brückner反光檢查的光學原理也如同攝影驗光法一樣。在一段距離、由直接眼底鏡的視孔同時看兩眼的瞳孔反光,瞳孔暗的一眼是注視眼,並且是低度數屈光不正;瞳孔亮的一眼是斜視眼,因為是由斜的方向觀察這個眼睛,光學上是高度遠視,於是瞳孔有反光,是亮的瞳孔 (圖4-10)。
2.4
Brückner Reflection Test
The
optical principle of the Brückner reflection test of the pupil is the same as
that of photorefraction. At a distance, the pupil reflections of both eyes are
simultaneously observed through the viewing aperture of a direct
ophthalmoscope. The eye with a darker pupil is the fixing eye and has a low
degree of refractive error; the eye with a brighter pupil is the strabismic
eye, because it is being observed from an oblique direction, optically it is
highly hyperopic, hence the bright pupil (Figure 4-10).
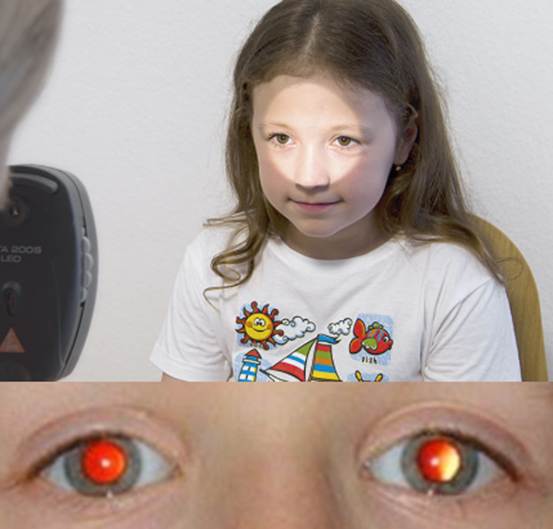
圖4-10 Brückner瞳孔反光檢查。瞳孔亮的一眼是斜視眼。
Figure
4-10 Brückner pupillary reflection test. The eye with the brighter pupil is the
strabismic eye.
2.5 一般攝影的紅眼問題
一般的相機拍人像的時候,不希望拍到瞳孔發亮,於是閃光燈的位置儘量不要太靠近鏡頭以免產生紅眼。但是攝影驗光法就是要利用這個反光去判讀眼球的屈光狀態,因此特地將光線和視線靠得很近,如同直接眼底鏡的構造那樣。
2.5 Red-eye in General Photography When shooting portraits with
a regular camera, it's best to avoid capturing bright pupils, so the flash is
kept as close to the lens as possible to prevent red-eye. However, photographic
refraction uses this reflection to determine the refractive state of the eye,
so the light source and line of sight are deliberately brought very close, similar to the structure of a direct ophthalmoscope.
2.6 以直接眼底鏡的光源作為間接眼底鏡檢查的光源使用
間接眼底鏡光學原理也是一樣,光線和視線儘量靠近才看得到眼底,光線離視線太遠就看不到眼底了。直接眼底鏡的點光源,可以作為間接眼底鏡檢查的光源使用,因為有調光器可調整亮度,特別適合小兒眼科的眼底檢查 (圖4-11)。從眼底鏡的視孔看出去,間接眼底鏡檢查所用的凸透鏡會反光,因此通常都是由視孔之外的位置去觀察。如果光源和視線的距離 (d) 太大,由公式可知,在低度數屈光不正的暗區會很寬,不利間接眼底鏡檢查眼底。將直接眼底鏡視孔上緣的邊框儘量做小,光學上就可以更符合間接眼底鏡檢查的光源要求。
2.6
Using the Light Source of a Direct Ophthalmoscope as a Light Source for
Indirect Ophthalmoscopy
The
optical principle of indirect ophthalmoscopy is the same: the fundus can only
be seen when the light source and the line of sight are as close as possible;
if the light source is too far from the line of sight, the fundus
cannot be seen. The point light source of a direct ophthalmoscope can be used
as a light source for indirect ophthalmoscopy because it has a dimmer to adjust
the brightness, making it particularly suitable for fundus examinations in
pediatric ophthalmology (Figure 4-11). Looking out from the viewing aperture of
the ophthalmoscope, the convex lens used in indirect ophthalmoscopy will
reflect light; therefore, observation is usually performed from a position
outside the viewing aperture. If the distance (d) between the light source and the
line of sight is too large, as shown by the formula, the dark area in low-power
refractive errors will be very wide, which is not conducive to indirect
ophthalmoscopy examination of the fundus. Making the
upper edge of the viewing aperture of the direct ophthalmoscope as small as
possible will better meet the optical requirements for the light source of
indirect ophthalmoscopy.
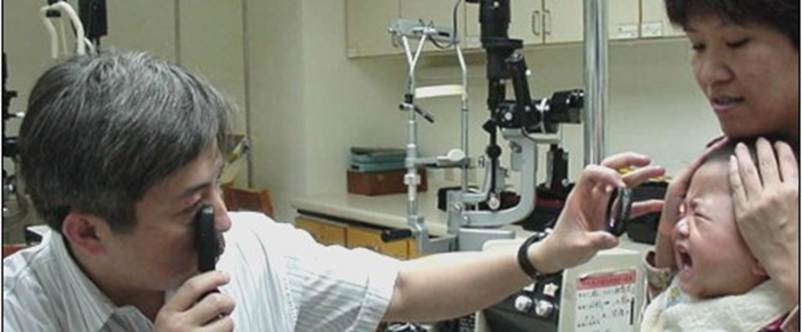
圖 4-11 以直接眼底鏡的光源作為間接眼底鏡檢查的光源使用
Figure 4-11 shows the use of a direct ophthalmoscope
light source as a light source for indirect ophthalmoscopy.
第3
節
手持型攝影驗光儀
d = DF x Pu x L x RR公式裡,DF(暗區)和RR位在等號的同側,二者是雙曲線的關係 (圖4-12)。至於反光的亮區Crescent等於1-
DF,於是亮區和屈光的關係便如下圖所示。早期的攝影驗光儀MTI依反光亮區的大小去判讀度數,由Crescent和屈光的關係圖來看,可以知道在低度數屈光範圍,以Crescent的大小去判讀屈光的解析度較佳;在高度數屈光範圍,解析度就很差。
Section
3 Handheld Photorefractive Optometry (MTI)
In the formula d = DF x Pu x L x RR, DF (dark area) and RR are
on the same side of the equation, and their relationship is hyperbolic (Figure
4-12). The reflected bright area (Crescent) is equal to 1 - DF, thus the
relationship between the bright area and refractive power is shown in the
figure below. Early photorefractive optometry (MTI) used the size of the
reflected bright area to determine the power. From the relationship between
Crescent and refractive power, it can be seen that in
the low refractive power range, using the size of Crescent to determine the
refractive power resolution is better; in the high refractive power range, the
resolution is very poor.
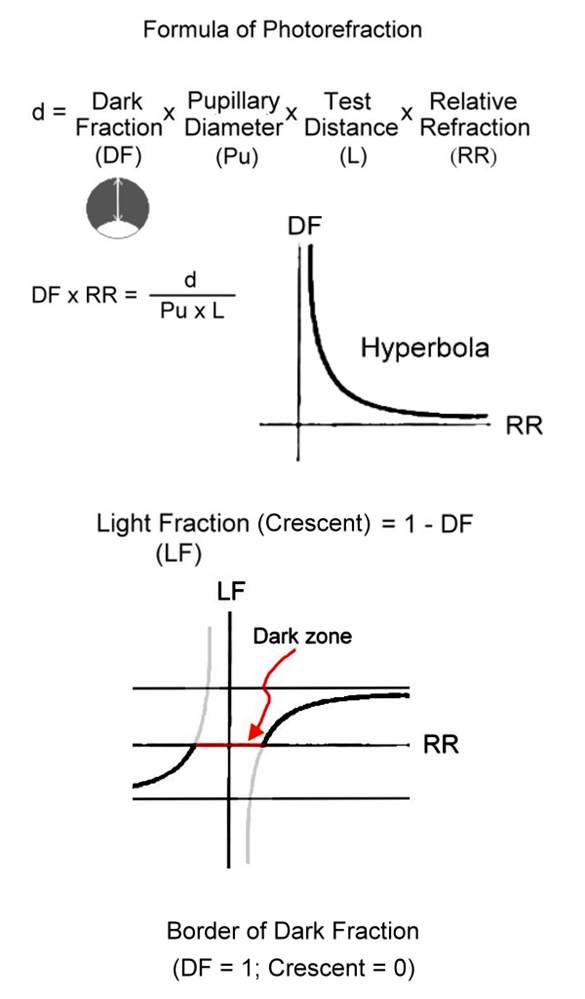
圖4-12 DF(暗區)和RR(屈光)位在等號的同側,二者是雙曲線的關係。
亮區(=1-暗區)和RR(屈光)的曲線是圖2-30的數學計算。
In
Figure 4-12, DF (dark area) and RR (refractive error) are on the same side of
the equal sign, and their relationship is hyperbolic.
The
curves for the bright area (=1-dark area) and RR (refractive error) are
mathematical calculations based on Figure 2-30.
d = DF x Pu x L x RR公式裡,d和RR是位在等號的兩側,兩者是線性關係。無論在任何屈光範圍,以d判讀屈光都有同樣好的解析度。Howard依此概念在手電筒前面放置一片階梯樣的紙板
(圖4-13),從階梯的邊緣觀測瞳孔反光,順著階梯的數字逐格向上,視線、光線的距離漸漸拉遠,反光Crescent越來越小,到達階梯的某一格時反光消失,這時Crescent=0,DF=1,依據公式,RR
= d / Pu / L,如果知道瞳孔大小(Pu)和測試距離(L),就可以由d精準地算出屈光值(RR)了。
In the formula d = DF x Pu x L x RR, d and RR are on opposite
sides of the equals sign, and they have a linear relationship. Regardless of
the refractive range, interpreting refractive errors using d provides equally
good resolution. Based on this concept, Howard placed a stepped cardboard plate
in front of a flashlight (Figure 4-13), observing the pupillary reflection from
the edge of the plate. As he moved upwards along the numbered steps, the
distance between the line of sight and the light gradually increased, and the
reflection (Crescent) decreased. At a certain step, the reflection disappeared,
at which point Crescent = 0 and DF = 1. According to the formula RR = d / Pu /
L, if the pupil size (Pu) and the testing distance (L) are known, the refractive
value (RR) can be accurately calculated from d.
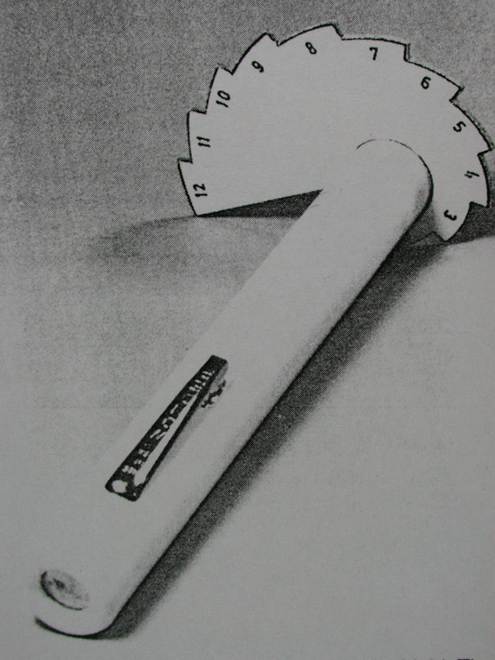
圖4-13
手電筒前面放置一片階梯樣的紙板,視線、光線的距離漸漸拉遠,反光Crescent越來越小。
反光消失處,Crescent=0,DF=1,依據公式,RR
= d / Pu / L。
Figure
4-13 shows a stepped cardboard panel placed in front of a flashlight. As the
distance between the line of sight and the light source gradually increases,
the glare (Crescent) decreases.
At the
point where the glare disappears, Crescent = 0, DF = 1. According to the
formula, RR = d / Pu / L.
從這樣的雛形,我們構思並倡議了手持型攝影驗光儀的製作。
From
this prototype, we conceived and advocated for the development of a handheld
photorefractive refractometer.
之前曾經將這個概念請天津光學廠開模製作,也和台大醫院醫工室合作,改造Heine的眼底鏡,製作過初步的成品
(圖4-14)。測試者上下推動推桿,調變視線、光線的距離,由視孔觀察瞳孔反光的大小, 反光由大漸小,以反光消失點 (DF=100%=1)作為判讀的依據,讀出屈光值。
Previously,
we commissioned Tianjin Optical Factory to develop and manufacture molds for
this concept. We also collaborated with the Biomedical Engineering Department
of National Taiwan University Hospital to modify Heine's fundus lens and
produced a preliminary finished product (Figure 4-14). The tester pushes the
lever up and down to adjust the distance between the line of sight and the
light source, and observes the size of the pupil
reflection through the viewing port. The reflection gradually decreases, and
the vanishing point of the reflection (DF=100%=1) is used as the basis for
interpretation to read the refractive value.
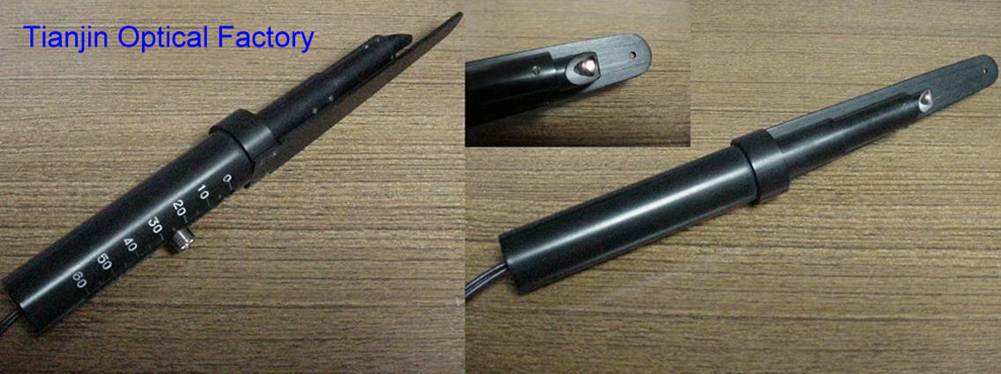
圖4-14
a天津光學廠製作手持型攝影驗光儀雛型
Figure
4-14 a Prototype of a handheld photorefractive optician manufactured by Tianjin
Optical Factory
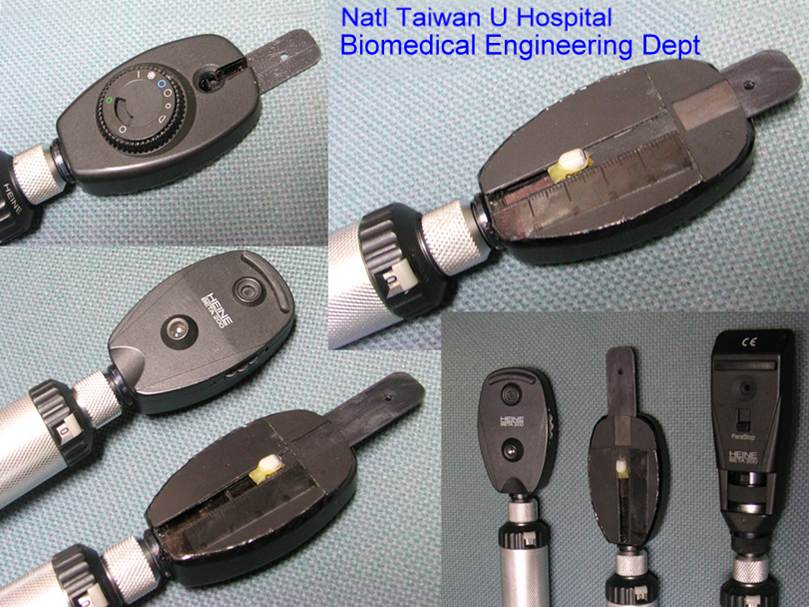
圖4-14
b台大醫院醫工室製作手持型攝影驗光儀雛型
Figure
4-14b shows a prototype of a handheld photorefractive refractometer produced by
the Biomedical Engineering Laboratory of National Taiwan University Hospital.
例如散瞳後瞳孔
For example, if the pupil is 8mm after
dilation and the test distance is 0.5m, applying the formula d = DF x Pu x L x RR, we get d = 1 x 8 x 0.5 x RR �� d =
4mm x RR. This means that
in any refractive range, 1D
refractive power has a resolution
of 4mm, which should be very practical.
和市售的攝影驗光儀不同的是,他們朝向驗光機的方向設計,而我們倡議朝眼底鏡/網膜鏡的方向去設計、去製作一支手持式的攝影驗光儀。冀望在眼科門診常規設置的直接眼底鏡和網膜鏡之外,再添一支小兒驗光用的利器。
Unlike
commercially available photorefractive instruments,
which are designed like refractometers, we advocate designing and manufacturing
a handheld photorefractive instrument that resembles a
fundus microscope/retinal microscope. Our hope is to add another useful tool
for pediatric refraction, in addition to the direct fundus microscope and
retinal microscope routinely provided in ophthalmology clinics.
如前所述,驗光機型式的攝影驗光儀是由斜向的瞳孔反光去計算屈光值,而我們倡議的手持式攝影驗光儀是由測試者將光源調整至散光軸的方向 (圖4-15),之後由正向的瞳孔反光判讀屈光值,類似於網膜鏡檢影法判讀散光角度的作法。我們感覺由正向的瞳孔反光去判讀屈光度數應該會更加直接和準確。
As
mentioned earlier, refractometer-type radiographs calculate refractive values
based on oblique pupillary reflections. However, our proposed handheld
radiograph method involves the user adjusting the light source to align with
the astigmatic axis (Figure 4-15), and then
interpreting the refractive value using positive pupillary reflections, similar to how retinoscopy is used to determine the
astigmatic angle. We believe that interpreting refractive power using positive
pupillary reflections would be more direct and accurate.
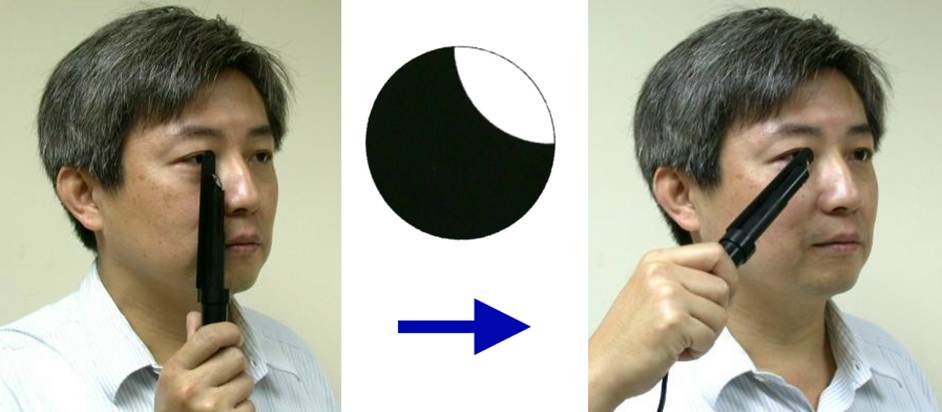
圖4-15
手持式攝影驗光儀是由測試者將光源調整至散光軸的方向
Figure
4-15 shows a handheld photorefractive refractometer, in which the tester
adjusts the light source to the direction of the astigmatic axis.
手持式攝影驗光法首先觀察瞳孔反光的方向,調變散光的角度;之後調變反光的大小,去讀取這個軸向的屈光值,再轉90度,調變反光大小,讀取另一個軸向的屈光值。 非常類似於網膜鏡檢影的操作方法,但是不需要放置中和鏡片,靠近嬰幼兒的眼前,可以避免嬰幼兒害怕、逃避和哭鬧。
The handheld photorefractive method first
observes the direction of the pupillary reflection and adjusts the angle
of astigmatism; then it
adjusts the magnitude of the reflection
to read the refractive
value along this axis, then rotates 90 degrees, adjusts the magnitude of
the reflection again, and reads the refractive value along the other axis. It is very similar
to the procedure for retinal
retinoscopy, but it does not require the placement of
a neutralizing lens. It is placed close to the infant's eyes, which can prevent the infant from becoming afraid,
trying to escape, or crying.
市售的攝影驗光儀要在固定的距離作測試,調整測試的距離常常需要花時間去瞄準視標。現今的科技有非常精確的測距儀,如果可以內建測距儀,直接得到公式裡的L,就不必在固定的距離測試,而且屈光值R=RR-1/L也可以由L值輕鬆計算得到。
Commercially available refractometers require testing at a fixed distance, and adjusting the
testing distance often takes time to aim at the target. Modern technology offers highly accurate
rangefinders. If a rangefinder
could be built-in to directly obtain the value of L in the formula, testing
at a fixed distance would be unnecessary, and the refractive value R = RR - 1/L could
be easily calculated from the value of L.
公式中瞳孔的直徑Pu,無論散瞳與否,也可以利用電腦圖學的科技測量得知。此一手持式攝影驗光儀的倡議需得依賴工研院的參與、設計與付諸執行。
The pupil diameter
Pu in the formula can be measured
using computer graphics technology, regardless of whether the pupil is dilated. This proposal for a handheld photorefractive refractometer requires the participation, design, and implementation
of the Industrial Technology
Research Institute (ITRI).
Recommended
readings and references
1. Howland
HC, Howland B. Photorefraction: a technique for study of refractive state at a distance. J Opt Soc Am 1974;64:240-9.
2. Howland HC, Braddick O,
Atkinson J, Howland B. Optics of photorefraction: orthogonal and isotropic
methods. J Opt Soc Am 1983;73:1701-8.
3. Howland HC. Photorefraction of eyes: history and future
prospects. Optom Vis Sci 2009;86(6):603-6.
4. Howland HC, Sayles N,
Cacciotti C, Howland M. Simple pointspread
retinoscope suitable for vision screening. Am J Optom Physiol Opt 1987;64(2):114-22.
5. Kaakinen K. A simple method
for screening of children with strabismus,
anisometropia or ametropia by simultaneous photography of the corneal and
fundus reflexes. Acta
Ophthalmol 1979;57:161-71.
6. Kaakinen K. Photographic
screening for strabismus and high refractive errors of children aged 1–4 years.
Acta Ophthalmol (Copenh) 1981;59:38–44.
7. Wang AH. Photorefraction and
retinoscopy with direct ophthalmoscope and laser pointer. Invest Ophthalmol
Vis Sci 1999:30(4):56.
8. Wang AH. Handheld photorefractor. 18th Congress of the Asia-Pacific
Academy of Ophthalmology, March 10-14. 2001, Taipei, Taiwan.
9. Wesemann W, Norcia AM, Allen
D. Theory of eccentric photorefraction (photoretinoscopy):
astigmatic eyes. J
Opt Soc Am (A) 1991;8:2038–47.
This
article is dedicated to the teachers at The Smith-Kettlewell Eye Research
Institute (SKERI): Dr. Arthur Jampolsky, Dr. Alan Scott, Dr. Anthony Norcia,
Dr. Eric Sutter, and Dr. Christopher Tyler. I vividly remember my year as a
pediatric ophthalmology fellowship in San Francisco, a place brimming with
talent and beauty, from 1990 to 1991.
Author:
Ai-Hou Wang

Education:
Bachelor of Medicine, National Taiwan University / Doctor of Clinical Medicine,
National Taiwan University / Fellow, Pediatric Ophthalmology and Strabismus,
The Smith-Kettlewell Eye Research Institute (SKERI) and Pacific Presbyterian
Medical Center, San Francisco, USA.
Experience:
Resident and Attending doctor, Ophthalmology Department, National Taiwan
University Hospital / Associated Professor, Ophthalmology Department, National
Taiwan University College of Medicine.
Current
Position: Consultant, Ophthalmology Department, Cathay
General Hospital / Attending doctor, Universal Eye Center.